loader image
Eclectic Photography
Veteran Cars, Veteran Mistakes: My L2BVCR2025 Photography Lighting Adventures In London On The Mall – Part 1

Veteran Cars, Veteran Mistakes: My L2BVCR2025 Photography Lighting Adventures In London On The Mall – Part 1

I’ve photographed the London to Brighton Veteran Car Run four times over the past decade, which is long enough to realise two things:

  1. These cars are older than my grandparents’ grandparents.
  2. Every year, I find a new way to make my life more complicated with gear.

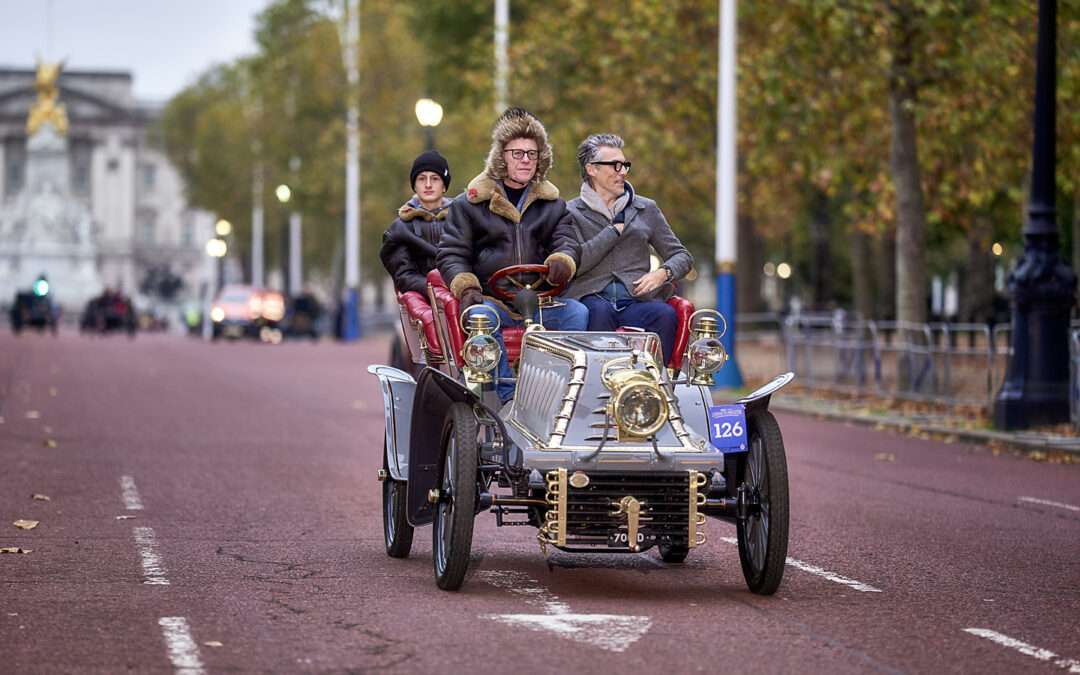
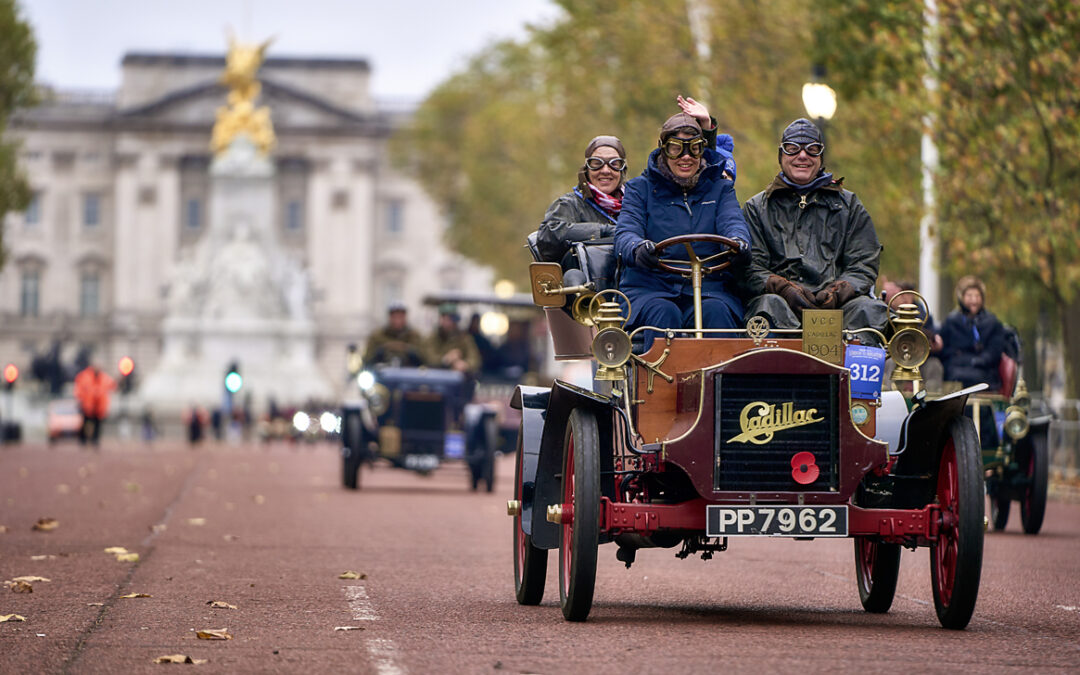
Out of all the spots I’ve tried, The Mall has become my personal favourite. Why? Well, where else can you watch 120-year-old cars rattle past Buckingham Palace on what is essentially a giant red carpet? Yes, the road is actually red — it’s as if the organisers thought, “If it’s good enough for royalty, it’s good enough for cars that require hand-cranking and prayers to start.”

The Mall also has the advantage of being wider than most London roads. More width = more ambient light = fewer excuses for blurry shots. The only catch? At 7am on a cold November morning, the “ambient light” is basically the same brightness as the inside of a teapot. Which is why I learned (the hard way) that some flash is essential.

Now, flash is both friend and foe. Lugging heavy strobes around at sunrise isn’t glamorous — you start to wonder if carrying a horse-drawn carriage might actually be easier. Over the years, I’ve tinkered with setups, and in 2024 I settled on a Godox AD100 with a MagMod Magbeam. This combo, plus a Phottix Padat 200 stand, gave me decent results… after I stopped missing cars while fiddling with positioning. (Pro tip: don’t arrive late. Old cars don’t wait for your light stand struggles.)

For 2025, I’m taking things up a notch — three Godox AD100s, reflectors galore, and a cunning plan to turn London’s lampposts into light stands with magnetic bases. Yes, I tested this on my street. Yes, the neighbours think I’m eccentric. But it works, and I’ll take “odd bloke with flashes stuck to lampposts” over “photographer with unusable shots.”

Now, let’s talk about car speeds. These beauties don’t exactly scream down The Mall like F1 cars — unless by “scream” you mean their engines actually screaming in protest. Still, their speeds vary, and here’s my quick guide to shutter speeds:

  • 10 mph → 1/500 s
  • 15 mph → 1/640 s
  • 20 mph → 1/800 s
  • 25 mph → 1/1000 s
  • 30 mph → 1/1250 s
  • 35 mph → 1/1600 s
  • 40 mph → 1/2000 s

(If anyone spots one doing 40 mph, please check if it’s secretly running on jet fuel.)

HXR322 330 web
251 BS8670 London To Brighton Veteran Car Run 2024 The Mall London K2photographic Web

With ISO hovering between 600–1000 depending on light levels, I’ve found High-Speed Sync (HSS) is my go-to. Hypersync has its uses, but HSS with Godox plus Magnum reflectors keeps things tidy, avoids ugly banding, and makes me look like I almost know what I’m doing.

As long as you keep flash-to-subject under 30 feet, ISO at 600, and shutter between 1/800 and 1/1000, a Godox AD100 pumping out around 1/8 to 1/4 power does the job. For 2025, my cunning plan is three flashes: two at the sides, one from above (for that divine “god ray” look), and one behind me on a lamppost to fill things in. It’s basically a lighting rig fit for a Hollywood premiere — except instead of celebrities, it’s cars that still think petrol costs thruppence a gallon.

I’ll write a Part 2 after the event, with images, tales of what worked, and probably a list of what went hilariously wrong. Until then, feel free to ask me questions — preferably about photography, not why my neighbours think I’m turning the street into a science experiment.


The Hopper Mausoleum & Godox AD300 Pro Flash

The Hopper Mausoleum & Godox AD300 Pro Flash

The Hopper mausoleum is a grand, elaborate structure unlike any other in the country. The mausoleum is located on Greymare Hill, roughly six miles from Consett. The location feels very remote, but the churches congregation continued until the early 1970’s when St Andrews church became abandoned. The mausoleum was erected by Humphrey Hopper of Black Hedley in the year 1752 for his beloved wife, Jane.

The upper part of the mausoleum is embellished with obelisks, scrollwork, shields and statues standing in shell-headed niches.  To the front, low stone walls, piers and iron railings enclose a paved stone floor. Under a sheltered arch lie the weather-worn stone effigies of Humphrey Hopper and his wife, Jane Hodgson. The top of the mausoleum is crowned with a large lantern. Unfortunately, the mausoleum has been the subject of recurring theft and vandalism over the years, and two of its statues are missing.

I have wanted to photograph this mausoleum for a few years now, but as it is quite a trek from Ouzlewell Green it remained on my to do list. Recently on the way back from Northumberland we had the time to take a detour from the A1. Despite a semi overcast day weather wise, I was determined to try and take a photograph. However, trying to make an image with just the natural light we had, it would not provide the feel and look I wanted. I decided to use one Godox AD300 pro flash with a 7-inch reflector to pop some light onto the structure of the mausoleum and under expose the natural light by a stop or two. The location was a little windy, so I asked Fran to and hold the light rather than use a travel light stand. All I needed to do, was place the camera on a tripod, takes some images with Fran in the frame with the light and then blend the images and remove Fran via Photoshop, well that was my intention. Anyway, here are some images of the process and the final outcome.

Hopper Mausoleum no flash copy 1
Fran Flashing Hopper Mausoleum copy 1
Fran Flashing Hopper Mausoleum2 copy
Hopper Mausoleum4
The London To Brighton Veteran Car Run 2024 – Commemorating the famous Emancipation Run of November 1896.

The London To Brighton Veteran Car Run 2024 – Commemorating the famous Emancipation Run of November 1896.

The London to Brighton Veteran Car Run 2024: A Photographer’s View

The London to Brighton Veteran Car Run is the longest-running motoring event in the world, held nearly every year on the first Sunday in November. This was our third time photographing it, and after a few experiences with those early November mornings—often damp and dim—we’ve learned a thing or two.

About eight years ago, Fran and I tried photographing the cars and drivers at the starting line in Hyde Park. While it was exciting to see the participants up close, I quickly found the scene a bit chaotic, with all the high-visibility jackets, security fencing, and endless selfie sticks. It was hard to capture the vintage feel with all the distractions. I learned a lot that first time and thought, “If I come back to shoot this again, I’ll definitely pick a better spot.”

In 2021, we found ourselves in London the same weekend as the Run, so I pulled out the route map to scout a new location. I landed on Constitution Hill—it seemed like a solid choice, with a clear view and fewer obstacles. While it was better than Hyde Park, Constitution Hill isn’t as open as The Mall, so the light wasn’t ideal when the first cars started rolling through. Still, the experience taught me more about what worked and what didn’t, which only motivated me to give it another go.

That led us to 2024. This time, I got a bit more strategic and took to Google Earth, “walking” along The Mall to scout good spots. I placed the little man on the map and “scrolled” back and forth, searching for places with the best vantage points—more on that in a bit!

Overcoming Photographic Challenges

Since the London to Brighton Veteran Car Run kicks off in November at 7 a.m., lighting is far from ideal. Add the possibility of drizzle or even a downpour, and conditions can be challenging. I knew a fast lens would make life easier, and I decided on a Sony 135mm G Master prime lens, shooting at f/2 with a shutter speed of 1/500 and ISO 400. Having a bit of fill flash would help add depth to the images, but the logistics of hauling lighting gear around London made me think twice about setup.

Thanks to Google Earth, I found potential spots where I could place a light stand without too much hassle. I’d tried Magmod Magbeams before and found that the second setting gave a nice balance for lighting the moving cars. Paired with a Godox AD100, I thought it could work—just enough fill flash to bring out details without overpowering the scene.

We arrived at The Mall a little later than I’d hoped, and the first wave of cars was already passing by. After a quick setup, I started experimenting with flash angles and positions, and I finally found a spot that worked. Early on, mixing flash with ambient light was tricky. The ambient was still low, so slower shutter speeds risked blurring, and higher ISO would introduce too much noise. But as the morning light gradually improved, blending flash and natural light became easier.

All in all, it was another learning experience—and a rewarding one at that! I also enjoy using small ultra portable strobes to light subjects and experimenting to see what can be created. Here are some images I captured along The Mall, using a Godox AD100 with a Magmod Magbeam on a Phottix Padat light stand.

HXR322 330 web
BT 15 321 web
251 BS8670 London To Brighton Veteran Car Run 2024 The Mall London K2photographic Web
70D 126 London To Brighton Veterna Car Run web
333 BH14348 web
F1367 367 London To Brighton Veteran Car Run 2024 copy
309 CL 233 L2BVCR2024 K2Photographic web
291 DQ1903 London to Brighton Veteran Car Run 2024 K2photographic web 1

k2photographic Images from The Mall, The London To Brighton Veteran Car Run 2024.  #veterancarrun #londontobrighton @royalautomobileclubmotoring

Fletcher Davies
K2photographic
FIRST TIME USING A MAGMOD XL ON THE ROOF OF A WATER TOWER

FIRST TIME USING A MAGMOD XL ON THE ROOF OF A WATER TOWER

[presto_player id=2306]

When it comes to flash photography on location, keeping kit both portable and light weight to me is important. Moreover, the main issue with modifiers on location is usually the wind, so unless you are willing to carry a load of sandbag’s or have assistants securing every light stand and modifier you use, things can quickly become a problem. Over the years MagMod have produced some great kit for small flashes, but if you wanted to use strobes with more power and of a larger size, it just was not possible with the previous MagMod modifier options. Roughly a year ago MagMod released the new XL Line of modifiers which brings their unique brand of lighting modifiers to larger strobes which includes everything from the MagSpheres and MagGrids to MagGels.

The reason I was interested in the XL line was the reflector, it works like a zoom reflector, but It’s unique in comparison to other zoom reflectors in that it collapses down for easy transport. Personally, I think having a reflector that can collapse down and be easily packed is a great idea and as it’s made out of silicone, this helps keep it ding and scratch-free which is one of the main issues when transporting reflectors. The Reflector XL can be attached to most brand-specific strobe mounts via insert rings. As I mainly use Godox AD300’s I ordered the Godox mount.

magmod reflector
61aMHSrSRIL AC UF10001000 QL80

As I had a short break to Norfolk in September 2024. If I wanted to take any lighting kit with me to play around with it needed to be ultra-portable and packable. I decided to purchase a MagMod XL Reflector  and sphere rather than splash out on the grids and gels all at the same time as I was on the fence as to if the XL line would really work, or just be pure marketing hype.

I used the MagMod XL on top of the roof of a water tower where we were staying, and it worked very well despite the wind. I certainly would not have been able to use a softbox or umbrella. Does the light quality of the XL match an umbrella or softbox? My answer to that is mixed, but it is a very useful and practical bit of kit especially in the wind. For me the fact that it is so portable and virtually indestructible makes it worth it in relation to the price I paid. Like every other bit of photography kit, it is not suitable for every photography situation and intention, but when it’s windy or you need to keep kit ultra portable, the XL provides a great solution.   

Hand Raising an Abandoned Greenfinch Chick

Hand Raising an Abandoned Greenfinch Chick

Hand Raising an Abandoned Greenfinch Chick

This story started on a scorching Friday afternoon, August 2nd, 2024. Fran was in the garden when she spotted a dead Greenfinch chick under our Cherry Blossom tree. Just as she was taking it all in, she noticed something move about a foot away—a tiny chick, barely alive and looking really dehydrated, lying in the leaves. I carefully sprinkled some water on the little guy and decided to leave it alone, hoping its mother might return. Since it was in the shade, I figured it had a better chance if she did. Still, I wasn’t holding out much hope that it would survive the night.

The next morning at 6:30 am, I let Rio, our Border Collie, out into the garden and was surprised to find the Greenfinch chick still hanging on, though it looked really rough. I couldn’t decide—should I help or let nature take its course? In the end, I decided to give it a shot, even though I had no clue how old the chick was. From what I could find online, it seemed to be less than a week old, but I wasn’t even sure what kind of bird it was.

Determined to help, I jumped online to find tips on raising baby birds. I knew the food had to be something similar to what its mother would give it—probably regurgitated stuff. We made a paste out of freeze-dried dog food and baby food, feeding the chick every 30 minutes until about 8 pm that Saturday. Between feedings, we kept it in a small box with air holes and some kitchen roll for bedding, just hoping it would make it.

Green Minch Monday Flights4
Green Minch Heather2

Sunday morning, before letting Rio out, I checked the box. The chick chirped—still alive and definitely hungry. On Monday, August 5th, I started looking for wildlife centers, but the nearest one was over 40 miles away. I didn’t know if the chick would survive the trip, and I couldn’t get through to anyone for advice, so I decided to keep doing what I was doing and learn as much as I could about hand-rearing a bird.

We stuck to the feeding routine for the next few days, but by late Wednesday afternoon, the chick seemed to be getting worse. I wasn’t sure it was going to make it. Thursday morning, I finally got some live mealworms, which I’d read were good for protein and hydration. I had to cut the worms in half so the chick could eat them, but by mid-afternoon, it started perking up. We switched to feeding it just mealworms every 30 minutes, and that seemed to do the trick.

Over the next few days, the chick’s feathers fluffed up, its colors became more vibrant, and it even started to stand and take tiny steps. By Sunday, August 11th, we’d kept the chick alive for over a week, and it was starting to take short flights, about two feet at a time, and perched on twigs we’d set up in a larger shoebox.

On Monday, August 12th, I started putting the chick outside on small bushes and branches in the garden. He began flying from spot to spot, taking naps in between, and I started calling him “Mr. Finch.” By late afternoon, Mr. Finch was flying longer distances around the garden, and then suddenly, he flew into a tree outside our yard. I couldn’t see or hear him, and while I hoped he was happy to be free, I worried he might not be ready. As dusk fell, there was still no sign of him, but there wasn’t much I could do.

The next morning, as soon as I let Rio out, Mr. Finch appeared, looking for food. I fed him at the bird table. Now, as I write this on August 15th, Mr. Finch comes and goes as he likes. I’m still feeding him mealworms about three times a day, and though he’s started nibbling on seeds, I think it’ll be a few more days before he’s fully independent.

This whole experience has been both tough and rewarding. I’ve learned a lot about raising a baby bird, and while I’m glad I could help, I hope I don’t have to do it again.

Green Minch In Heather1