Using Off Camera Flash For Horse Portrait Photography – Which Lighting Modifier Should I Use?
When photographing horses, especially when trying to create horse portrait style images, not only can the choice of lighting modifier make or break the image, but just as importantly, the choice of modifier may be determined by the location and weather conditions, together with the nature and colour of the horse. Photography is subjective, the aim of everything typed out in this blog, is to provide some foundation ideas (starting points) Like everything in life you have to practice, reflect and learn from what did not work and question why. There are numerous books about photography and lighting, find one that you enjoy and can understand and read it over and over again. There are also some good videos on YouTube and the web too, that can teach you about the basic principles of using flash and how to modify it.
I decided to write this blog, as when I started out photographing horses with flash, finding information was near on impossible in relation to lighting horse unless it were studio based. All of the images on my website K2photographic.com are taken on location, I hope you find what I share of some use.
Horses can be unpredictable, so spend some time prior to a shoot talking to the owner and getting to know the horse as best you can. Introduce the horse to your equipment slowly, fire a few test flashes with the horse at least 30 feet away from the light. Slowly and safely move the horse closer to the light, so they can get used to the flash firing, if the horse is spooked during this stage you may have to make the decision that the horse in sensitive to flash and it would be unwise and be a safety risk to continue. Your first concern should be for the wellbeing and safety of the horse, yourself and other people assisting the shoot. As the photographer you need to take control and say, we will not be using flash for this shoot.
If the horse is not affected by the flash firing, your next challenge is to work out which lighting modifier is best suited to the task in hand. Horses have large, curved, reflective surfaces (coats), prominent facial structure, and can be easily startled, so your choice modifier will affect both aesthetics and practicality. if it’s windy a softbox and umbrella will cause you potential safety risks, so don’t use them. If it’s too windy for a softbox or umbrella would a hard reflector be suitable and safer to use? Photographing animals indoors and outdoors is not easy, so adding lighting to the mix will make the task even more of a challenge and even with years of experience I still find myself having to think on my feet occasionally in terms of which lighting modifier to use. Personally, I have found that despite the stress, this is often when my lighting technique develops and improves, some of my best images have been a result of thinking on my feet. However, sometimes I fail despite all my planning and thinking on my feet.
Below is a breakdown of some of the lighting modifiers for horse portrait photography with flash that used, I have tried to outline the advantages and disadvantages from my experiences for each, and hope it provides some starting points.
1. Large Softbox (Octabox or Rectangular, 90–150 cm / 36–60”)
Best for: Classic equine portraits, beauty-style lighting, full-body softness.
✔ Advantages
- Soft, even light that wraps nicely around the contours of the horse.
- Excellent catchlights in the eyes.
- Controlled spill, helpful outdoors to avoid lighting the background unintentionally.
- Works well for both studio-style stable portraits and controlled outdoor environments.
✘ Disadvantages
- Large footprint—horses may be spooked or bump or brush against such a large modifier.
- Can act like a sail outdoors; requires sandbags or an assistant.
- Will suck power from your flash, far from ideal on bright days
- Slower to set up.
2. Umbrellas (Shoot-through or Reflective, 45”–60”)
Best for: Quick, soft lighting outdoors or on-location where portability matters.
✔ Advantages
- Super portable and quick to set up.
- Excellent big soft light—ideal for horse headshots and ¾ body portraits.
- Cheaper and more portable than most softboxes.
- Can be effective on cloudy days or shady areas
✘ Disadvantages
- Less control: lots of spill, which may light parts of the animal unintentionally.
- Prone to blowing over outdoors.
- Shoot-through umbrellas can make horses flinch due to the bright flash diffusion close to them.
3. Beauty Dish (White interior, 27”–33”)
Best for: Detail-focused portraits of the head/neck, show horses, fine-art style.
✔ Advantages
- Crisp, sculpted light: reveals detail in muzzle and eye contours beautifully.
- Less spill than umbrellas; tighter light pattern.
- Useful for creating dramatic rim and side light.
✘ Disadvantages
- Can be too contrasty for dark-coated horses.
- Works best when fairly close—may be intimidating to some horses.
- Requires more precise positioning.
4. Strip Softboxes (Narrow, e.g. 12×36” or 12×48”)
Best for: Rim lighting, edge highlights along the mane, neck, or body.
✔ Advantages
- Beautiful, controlled rim light for fine-art equine portraits.
- Narrow shape prevents unwanted spill.
- Great for multi-light setups.
✘ Disadvantages
- Not suitable as a primary light—too narrow for full coverage.
- Requires stands placed to the side or behind—some horses may shy away from objects near their hindquarters.
5. Scrims / Diffusion Panels Large 6×6 ft or 8×8 ft (I have never used these)
Best for: Natural-light horse portraits (not technically a flash modifier but commonly paired with flash).
✔ Advantages
- Produces extremely soft, natural light, like a huge softbox.
- Horses tolerate them well—they look like simple fabric screens.
- Excellent in sunlight to avoid patchy highlights.
✘ Disadvantages
- Not ideal in strong wind.
- Requires grip gear or assistants.
- Slower to set up compared to a simple umbrella.
Below are a few suggestions on lighting modifiers depending on style and setting.
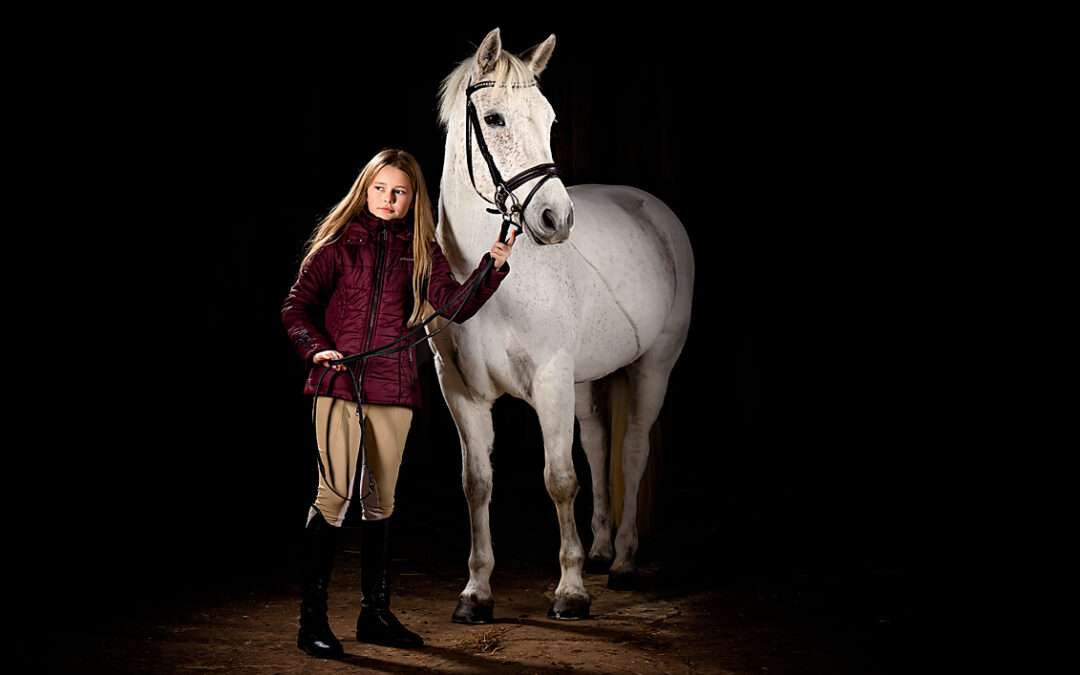
Fine-art black background portraits (popular stable-door shots)
- Large softbox or octa as key light
- Strip boxes for rim/hair light
- You can also fire a flash at a portable reflector held and angled by an assistant
Outdoor environmental portraits (when there is no to little wind)
- Large umbrella or parabolic umbrella
- Softbox if you need more control on spill
Detailed head portraits
- Beauty dish for sculpting
- Large softbox or octa for a softer, classic look
Hard reflectors do have a place in horse portrait photography—just with more specific, controlled uses than softboxes or umbrellas. They can create striking, high-contrast images when used well, but they also come with some real challenges when working around large, reflective, easily spooked animals.
Here’s a clear breakdown.
🔦 Hard Reflectors in Horse Photography
What counts as a “hard reflector”?
These include:
- Standard reflectors (7” or similar)
- High-output reflectors (e.g., Profoto Magnum)
- Long-throw reflectors
- Snoots, barndoors, grids (technically accessories for hard reflectors)
They all share the same core trait:
➡️ Small, highly directional sources that produce hard-edged light and pronounced shadows.
⭐ Advantages of Hard Reflectors
1. Power + Distance
Hard reflectors are extremely efficient.
- Great when you need to throw light from farther away (useful if a horse is nervous about equipment).
- Ideal outdoors when you need punch to overpower bright daylight.
2. Strong, dramatic modelling
Perfect for:
- Muscle definition
- Sharp highlights on the neck and jawline
- Dramatic fine-art looks
This can be stunning on Arabians, sculpted sport horses, or glossy coats.
3. Better control without giant modifiers
Hard reflectors:
- Are compact
- Create minimal wind resistance
- Are easy to position without worrying about large fabrics flapping near the horse
4. Excellent for backlight / rim light
They create clean, crisp rim light that:
- Separates dark coats from dark backgrounds
- Highlights manes and forelocks with sparkle
- Works much better from a distance than strip boxes when space is tight
⚠️ Disadvantages of Hard Reflectors
1. Harsh light on glossy coats
Horses—especially dark, shiny ones—reflect like cars.
Hard reflectors can produce:
- Hot spots
- Harsh specular highlights
- Distracting blown-out patches on cheeks or bodies
On sweaty horses, this becomes very difficult to control.
2. Strong shadows that emphasise texture
Wrinkles, scars, clipped fur and uneven coats become more noticeable.
3. Higher risk of spooking
While they’re smaller, the bare flash pop is harsher:
- Closer to a point-source burst
- More intense per square inch
Some horses flinch at the sudden intensity.
4. Limited for full-body softness
You simply cannot get soft, flattering full-body light on a horse using a small hard reflector.
5. Requires precise placement
Small changes in angle create big changes in look.
This is challenging when your subject:
- Moves their head
- Adjusts stance
- Turns slightly
🐴 When Hard Reflectors
Work Well
in Horse Photography
✔
1. Dramatic, fine-art style with heavy contrast
Especially in dark barns or against black backgrounds.
✔
2. Rim light / kicker light
Placed behind or to the side for glowing mane, outline, and separation.
✔
3. Mimicking sunlight
Aim from high and far away: produces believable, crisp “sun rays”.
✔
4. Outdoor fill in bright sunlight
A hard reflector can cut through midday sun to:
- Brighten shadows under eyes
- Add a sharp highlight on the coat
✔
5. When the horse must stay far from the light
Because hard reflectors are efficient, you can light from 4–10 metres away without a problem.
🐴 When Hard Reflectors Are
Not
Ideal
- For glossy, dark horses
- When you want soft, painterly portraits
- For shy/nervous animals
- For stable-door black-background portraits (soft is usually better)
- For full-body lighting—you need something larger
🎯 Best practice when using a hard reflector with horses
1. Use grids to control spill
Helpful for:
- Backdrops
- Avoiding light on handlers
- Keeping attention on the head/neck
2. Increase distance
The farther the light, the less intimidating the flash burst feels.
3. Feather the light
Rather than aiming directly at the horse, skim the beam across the front.
This reduces hot spots.
4. Combine with a soft fill
Hard key + soft fill can give detail without harsh contrast.
🐴 1. HARD REFLECTOR vs SOFTBOX (SIDE-BY-SIDE COMPARISON)
A. Key Light Characteristics
| Feature | Hard Reflector | Softbox / Octa |
| Shadow quality | Hard, crisp | Soft, gradual |
| Highlight control | Difficult (prone to hot spots) | Easy (broad, diffused) |
| Working distance | Excellent | Limited (needs to be closer) |
| Wind safety | Very good | Can be risky outside |
| Horse comfort | Medium–low (sharper pop) | High (softer flash) |
| Coat appearance | Glossy but risky | Flattering and smooth |
| Use case | Dramatic, sculpted | Classic, fine-art, soft |
2. BEST JOBS FOR HARD REFLECTORS IN EQUINE PORTRAITURE
✔ Dramatic “sculpted neck” portraits
Perfect for high-contrast, rim-lit, or moody black-background portraits.
✔ Backlight to illuminate mane/tail
Hard reflectors create beautifully crisp edge highlights.
✔ Outdoor fill in bright sun
Punchy output helps lift deep shadows under chin and eyes.
✔ Shooting from a long distance
If the horse is worried about gear, the reflector can be placed 5–10 metres away.
6. HARD REFLECTOR — PROS & CONS SUMMARY
⭐
Advantages
- Long throw, great for timid horses
- Excellent for rim/backlight
- Creates dramatic, artistic portraits
- Handles wind very well
- High flash efficiency
- Good for strong daylight
⚠️
Disadvantages
- Harsh on glossy/dark coats
- Can produce distracting hot spots
- Less flattering for soft portraits
- Requires precise angles
- Flash burst can feel stronger to the horse